How to Create SSH Keys
Table of Contents
- What is the purpose of ssh keys?
- How does it work?
- How to implement ssh-key authentication
- Adding the key to the server
- Disabling SSH password authentication
- Disabling the root password
- Notes
SSH passwordless key based authentication
What is the purpose of ssh keys?
SSH-key authentication is a way of identifying yourself by proving that you know the private key associated with a given public key. It can be more secure than password authentication, but it requires more effort to set up.
How does it work?
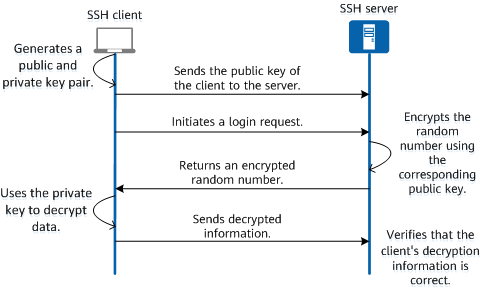
SSH keys are based on asymmetric encryption. Simply put, it can only be encrypted and decrypted in one direction. It requires a pair of keys, known as public and private Host keys. The public key can be sent out freely to servers, users and third parties. However, the private key is to be kept securely on the client machine.
Public keys are only used to encrypt messages and private keys are used to decrypt messages encrypted by the public key of the public and private key pair. A public key cannot be used to generate a private key, but the same cannot be said for the private key. It can be used to create a new public key if lost.

How to implement ssh-key authentication
The default bit size for an RSA key is 3072 bits and the minimum 1024 bits. If you want to choose a specific size you need to use the -b flag followed by the size, i.e., -b 2048.
1. Create the keys using Linux ssh-keygen with the type of
rsausing the -t option. The filename can be specfied using the-foption. Comments can be set for identifying the usage of the key. E.g.,-C "username@domain_name.co.uk. A recommendation is to add a passphrase to the file to password protect it when prompted.
ssh-keygen -t rsa -f /path/to_file/filename -C "username@domain_name.co.uk"
Two files should be created, i.e.,
id_filename(private) password protected with the passphrase andid_filename.pub*(public).
2. Confirm the files were generated by listing the files.
ls -l /path/to/file
Adding the key to the server
The keys can be copied using different ways, copy and paste or using ssh-copy-id. The latter is my preferred method.
ssh-copy-id
It will only work for Unix-like OS’s, not on Windows.
- Using ssh-copy-id, a lot of the leg work is taken care of for you. Like, the creation of directories and files and modification of pre-existing authorized_keys files.
ssh-copy-id -i /path/to/file username@1.10.120.10
- Test the connection to the server from the client machine. Not on the device we had just created the file. It requires the private key, the file without the .pub extension.
ssh -i /path/to/file username@1.10.120.10
Once on, we could also view the authorized_keys file to find what's changed. The previous command has already logged us in, if successful.
vim ~/.ssh/authorized_keys
- Next disable ssh password authentication found below under Disabling SSH password authentication.
Copy and paste method
- Create an authorized_keys file on the remote device if it does not already exist. If it does exist, skip to step 3.
touch ~/.ssh/authorized_keys
- Change the file permissions on the authorized_keys file. Otherwise, you won’t be able to log in. Troubleshooting authentication issues involves viewing the
auth.logfile on the server, e.g.,
sudo vim /var/log/auth.log

sudo chown username:username ~/.ssh/authorized_keys
sudo chmod 0644 ~/.ssh/authorized_keys
- Copy the public key text to the server/remote device. The private key stays on the local machine, the one initiating the connection.
Use
catto display the text. Opening the file and copying the text could introduce anew linewithin the key's text.
Local device
cat /path/to_file/filename.pub
4.** Paste the key into the remote file ~/.ssh/authorized_keys of the user required.
Remote device
vim ~/.ssh/authorized_keys
Paste text and save.
- Change the file permissions on the local device other it will error.
@@@@@@@@@@@@@@@@@@@@@@@@@@@@@@@@
@ WARNING: UNPROTECTED PRIVATE KEY FILE! @
@@@@@@@@@@@@@@@@@@@@@@@@@@@@@@@@
Permissions 0777 for 'id\_rsa' are too open.
It is required that your private key files are NOT accessible by others.
This private key will be ignored.
Load key "id\_rsa": bad permissions
dre@1.10.120.10: Permission denied (publickey).
sudo chmod 0600 ~/path/to_file/filename
- Test connection to server from the client machine.
ssh -i /path_to_public_key/file username@1.10.120.10
Disabling SSH password authentication
- Once you have successfully tested the ssh keys, we can continue by disabling ssh password authentication. By modifying the option within the
/etc/ssh/sshd_configfile.
sudo vim /etc/ssh/sshd_config
*Note: ensure its
sshd_configand notssh_config.
Add the following lines or modify the file if they exist to match
PasswordAuthenticationandChallengeResponseAuthenticationbelow.
# To disable tunneled clear text passwords, change to no here!
PasswordAuthentication no

# Change to yes to enable challenge-response passwords (beware issues with
# some PAM modules and threads)
ChallengeResponseAuthentication no
- Restart the SSH service for the changes to take affect.
sudo systemctl restart sshd
Disabling the root password
- If you haven't done so already, set the root password
sudo passwd root
Enter password:
- Unless you require the root user account, it's best to set a password and lock the account. Use
sudoto gain root privileges.
sudo usermod -L root
- Confirm by viewing the
/etc/shadowfile, ensuring the root password begins with an!(exclamation mark). Meaning the account is locked.
sudo vim /etc/shadow
Notes
~/.ssh directory and file permissions
.sshdirectory:700 (drwx------)- public key (
.pubfiles):644 (-rw-r--r--) - private key (
id_rsa):600 (-rw-------) ~/.ssh/config: 600 (-rw-------)- Your home directory should not be writeable by the group or others (at most the default is)
755 (drwxr-xr-x)
Username/email address at the end of the file (comment)
Public keys consist of the following space-separated fields: options, key-type, base64-encoded key, comment. The comment field is not used for anything (but may be convenient for the user to identify the key).