Juniper's Answer to Cisco's Macro [groups]
Learn how to utilise Juniper groups
Table of Contents
- Why would you want to use a macro in the first place
- What is the equivalent on a Juniper device
- How do we apply the groups' configuration?
- How any groups can be applied using apply-group
- Putting it all together
- Finally, time to commit the changes
- Verifying the groups' configuration has been inherited
- A few additional benefits
Why would you want to use a macro in the first place?
A macro’s use on Cisco is a very convenient way of standardising a group of commands that can be used multiple times. One example would be port configuration. Rather than having to type the same configuration repeatedly, applying a macro minimises the risk of human error, if used in the right way! A macro can be used in many different scenarios, however, on this occasion, we will be referring to configuration and not a list of commands.
What is the equivalent on a Juniper device?
Juniper’s version is called groups. The use of groups is based on an inheritance model, meaning the source configuration can be applied multiple times elsewhere within the configuration. Any changes made within the groups' configuration are applied to the target without any extra work.
They can be set up from the top level in edit mode:
set groups <group-name>
You should name the group accordingly to the use case, trying to keep a unique name from the rest of the configuration which may share the same name. This later allows you to make global changes without affecting another configuration's stanza.
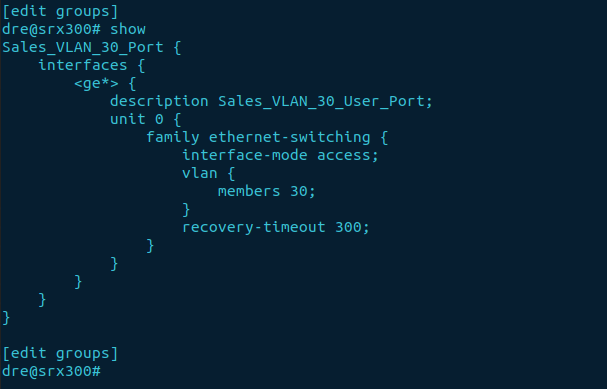
Below is an example of setting up the groups configuration to be used under interfaces.

How do we apply the groups' configuration?
Well, it's as easy as apply-group [groups name], under the configuration stanza of choice. For instance, if we made a groups' configuration for interfaces, we would apply it like this:
set interfaces <port> apply-group <group-names>

How any groups can be applied using apply-group?
If you hadn't noticed previously, the value applied can be a single group name, or a set of groups, enclosed within square brackets (e.g., [ group-1 group-2]). As a personal preference, I'd usually apply just one group to an interface to avoid confusion, unless you have a more advanced configuration that requires so.
Putting it all together.
Before we finish, I want to mention that if there is any dependency outside the scope of the groups' configuration stanza, i.e., VLAN configuration, it will need to be in place to prevent any commit errors or incorrect functionality. The dependency in this instance would be the VLAN configuration. I will configure the VLAN requirement before committing the configuration.

Finally, time to commit the changes.
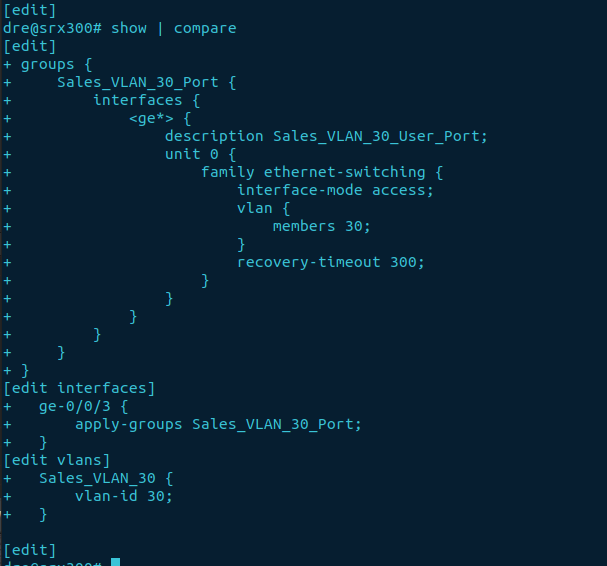
Firstly a quick eyeball of the configuration to be applied.
show | compare

If all looks to be in order, we can use a commit check to run a sanity check before actually committing the configuration.
commit check

OK, the commit check succeeds, let's commit the configuration or commit confirmed for the more cautious approach.
commit

Verifying the groups' configuration has been inherited.
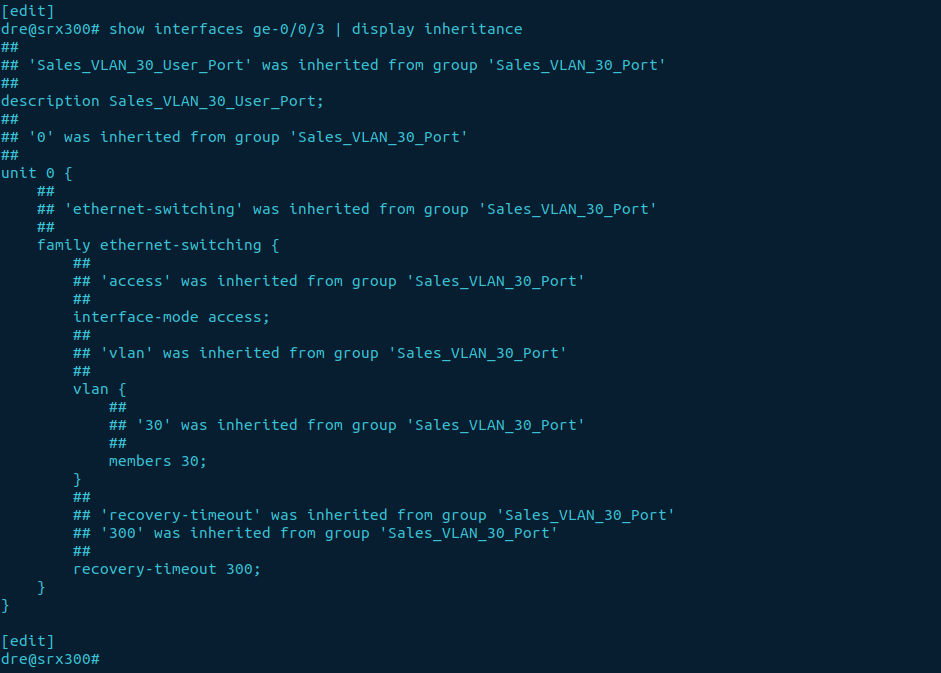
To check if the configuration has been inherited, we can use a show command in edit mode, coupled with an additional piped "|" display output. This is what the command would look like for port ge-0/0/3, utilising display inheritance:
show interfaces ge-0/0/3 | display inheritance
Now we can clearly see the apply-groups group has successfully been applied and inherited the groups' configuration. Shown below:

A few additional benefits.
Now you know how to create and utilise groups, but what other benefits does it provide?
- Reduces the lines of configuration when displayed.
- Makes troubleshooting easier when asked if the configuration is the same as another port.